Always On Availability Group is a disaster recovery and high availability feature of SQL Server that allows you to obtain synchronized secondary replicas of some primary databases to be used as failover in case of falures on primary replicas or as a readonly solution to separate workloads that require read-only access.

In this guide, you will learn how to configure the necessary prerequisites, create the failvoer cluster and the availability group, and connect to the read only replica from PowerBI.
This is a list of steps for configuration:
Creating Azure Prerequisites
Creating a Domain Controller
Creating two virtual machines with SQL Server installed, in an availability set, joined to a single domain, with Failover Clustering installed
Creating an Azure Storage Account, for the cloud witness
Creating an Azure Load Balancer to use as a listener
Firewall rule setting for the two SQL Servers: ports 1433 (for the default instance), port 5022 (or other available) for endpoint mirroring, port 59999 (or other available) for the load balancer health probe
Create a domain account to use for installation. You must be an administrator of the two SQL Servers, SQL Server service accounts and SQL Server Agent, and a login on the two servers with the sysadmin role
Creating a Failover Cluster with the two SQL Servers
Creating the Always On Availability Group
Read-only routing configuration
Test the solution
Azure Prerequisites
Resource Group
Let's start by creating a resource group that will host the resources we are going to create.

Virtual Network
You will need a network to host the domain controller and the two SQL Servers.
In our example:
Name: Vnet01
Region: WestEurope
IP Addresses: 192.168.0.0/16 (another range of private IPs is also fine)
Subnet:
domain 192.168.10.0/29 (for domain controller)
sqlcluster 192.168.20.0/24 (for CLUSTERed SQL Servers)

Availability Set
This step is important because to configure the load balancer that will act as an endpoint listener it will be necessary that the machines of its backend pool (the two SQL Servers) are in an Availability Set.
Currently, you can only add a virtual machine to an Availability Set when you create it.
If you create availability set virtual machines first, you won't be able to add them to the set later.

Domain Controller
Let's create the virtual machine that will act as a domain controller.

For the demo we use a small size and do not close access via public endpoint.
Make a note of the credentials you use.


Once the VM is created, enter with the user used, in this case domainadmin.
Install Active Directory Domain Services
From Server Manager select Add roles and features.

Click Next to the Server Selection menu, select the server and press Next

From Select server roles flag Active Directory Domain Services and DNS Server

Click Next until Confirmation and then click Install

When the installation is complete, a warning flag will appear at the top right.
Close the Add roles and features wizard window.

Click the warning icon and select Promote this server to a domain controller
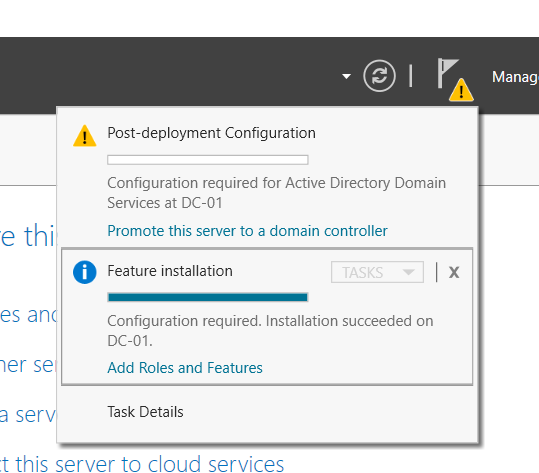
The domain controller configuration wizard will open.
select Add new forest and enter your domain name, in this case we use our own domain datasoluzioni.it

Enter a password for the Directory Service Restore Mode.

Click Next to the Prerequisite Check menu.
Check the warnings but if the green flag "All prerequistes check passed succesfully" appears you can proceed.
Click Install

The computer will restart after installation.
Configure DNS in your virtual network
From the Azure portal, select the virtual network that you created earlier, in this case Vnet01.
and from the DNS Server panel, add the IP address of the domain controller that you just configured.

Create SQL Server Virtual Machines
Let's create the two SQL Servers from an image available in Azure with SQL Server 2019 Developer Edition on WindowsServer2019.
You can also create only the Windows Server and then install and configure the instance of SQL Server yourself.
The important thing here is to remember on Availability options to insert the VM in the availability sets created previously, in this case AS-sql.
Make a note of your credentials.


Select the connectivity, service port, and enable authentication using SQL Authentication.
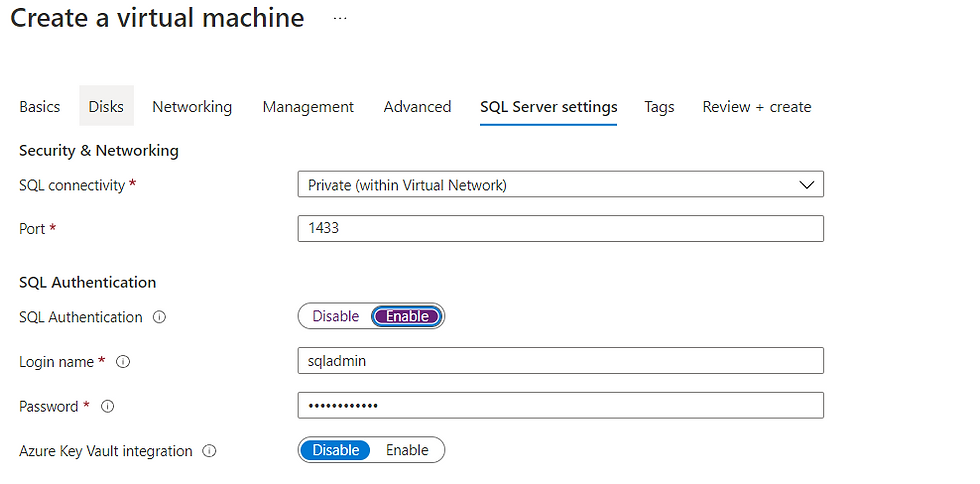
Select the other options you want and create the VM.
The same procedure must be followed to create the second node of the cluster, in this case called Win19-SQLN02.
When the deployment is completed we will have the 3 virtual machines:
DC-01 domain controller
Win19-SQLN01 first node of the cluster
Win19-SQLN02 second cluster node

Join the SQL Servers to the domain
Log on the two virtual machines Win19-SQLN01 and Win19-SQLN02 and join them to the domain.
Enter the machine with the sqladmin user that we defined during the creation phase.
From Server Manager select Local Server and then WORKGROUP

Select Change to rename the computer or change its domain

On Member of select Domain and enter your domain.
Click OK

You will be asked to authenticate with accounts that have permission to add objects to the domain use the account created together with the domain controller in this case domainadmin

When you confirm receipt, select OK.
Restart the computer as prompted.

Do the same on the second SQL VM.
Once the reboots are complete, you can verify the success of the operation from the domain controller, look for Active Directory Users and Computers --> Computers.

or by logging into the two SQL VMs instead of workgroups the domain name will appear.

Create the installation account
Next, you need a domain account to use to set up the cluster failover and availability group.
Enter the domain controller, search for Active Directory Users and Computers, right-click on Users --> New --> User

We call it clusteradmin. Press Next

Select a password and the options you want.
Click Next

Click Finish.

Also from the Active Directory Users and Computers menu click View --> Advanced Features

Right-click on the menu Computers and select Properties --> Security
Click Add

Search for the new user clusteradmin and select OK

From the Group box or user names click Advanced for special permissions and advanced settings.

From the Permission menu, select clusteradmin and click Edit

Make sure that in the permissions it is flagged
List contents
Read all properties
Read permissions
Create Computer Objects

Click OK and then Apply twice to confirm the settings.
Add the installation account to the two SQL Servers
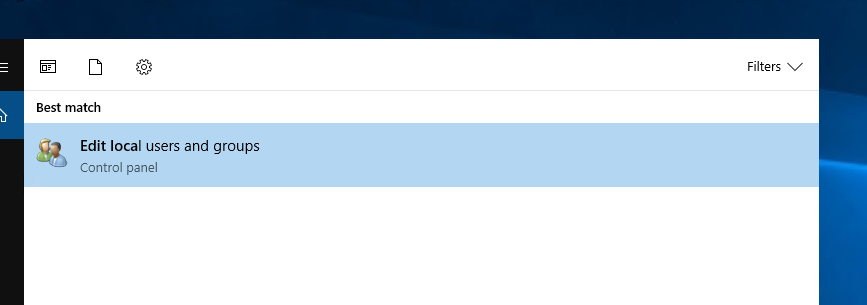
Enter the SQL VMs and search for Edit local users and groups
On Groups, right click on Administrator and select Add to Group...

Click Add

Locations--> Entire Directory.
Select clusteradmin click OK, and then Apply.

Repeat the same process on the second node.
Create the failover cluster
Log in to the first node of the cluster with the user clusteradmin.

From the Server Manager select Add roles and features, click Next up to the featurs menu and flag Failover Clustering

Click Next and Install

Repeat the step on the second node.
Once the restart is performed, return to the first node, always with the clusteradmin user.
Open the cluster manager failover

at the top right, select Validate Configuration.
This step is valid if the server configuration is correct to create the cluster.
Click Next

Click Browse to choose the servers

Select the SQL Servers and click OK


Click on Next
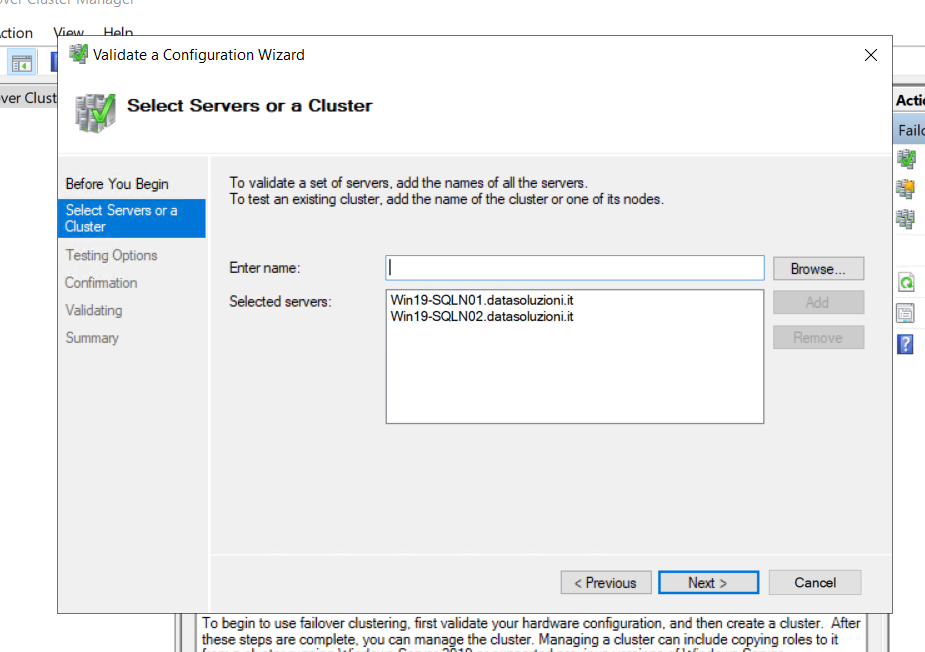
Click Next to the Confirmation menu
Press Next to start validation.

At the end of the validation, a warning signal may appear but the test is completed successfully.
If you see a red X, there is some error that will not allow you to configure the cluster.
Flag Create the cluster now using the validated nodes...
Click Finish.

Open the cluster creation wizard
Click Next

Give the cluster a name, in this case SQLCLUSTER01

Press Next to create the cluster

The cluster was created successfully
Click Finish

The failover cluster is online, consisting of the two nodes Win19-SQLN01 and Win19-SQLN02.

Configure quorum witness
This step is important to allow the cluster to remain active during failures.
In general, each node has assigned a vote, for the cluster to remain active it is necessary that there is always online the majority calculated as (number of nodes /2) +1).
If a node of two fails, the majority is not satisfied and the entire cluster goes down.
A witness allows you to have an additional vote to allow the cluster to stay online.
Let's create the Azure storage account to be used as a cloud witness.

Right click on our cluster and select More Actions --> Configure Cluster Quorum Settings

Click Next

Select Select the quorum witness and click Next

Select Configure a cloud witness

Let's enter the data of our Azure storage account and click Next.

Click Next until the quorum settings configuration is confirmed.
Click Finish

The cluster failover will look like this:

Prepare the SQL Servers
Enter the first node of the cluster (Win19-SQLN01).
Open the Windows firewall and verify that there is an inbound rule for TCP port 1433.
When you create a virtual machine with the default SQL Server image, it will already be inserted by default, otherwise it will be added.

Create another inbound rule with the following characteristics (they will be used later to configure the load balancer as an endpoint listener).

Open SQL Server Configuration Manager and verify on Network Configurations that TCP/IP is Enabled

Change the SQL Server service account with clusteradmin
On Account Name click Browse:

Select clusteradmin and confirm.

Enter your password and click Apply.
Restart the service for the changes to take effect.

Do the same with the SQL Server Agent account.

Also from the configuration mananger, SQL Server service property enable the Enable Always On Availability Group flag

Open SQL Server Management Studio and connect to the server with the sqladmin user (the one defined when creating the VM)

right click on Security --> New Login

Create a login for clusteradmin

on Server Roles make sure to give it the role of sysadmin

Also launch the following instructions for some grant to your account
[NT AUTHORITYSYSTEM]
GRANT ALTER ANY AVAILABILITY GROUP TO [NT AUTHORITY\SYSTEM]
GO
GRANT CONNECT SQL TO [NT AUTHORITY\SYSTEM]
GO
GRANT VIEW SERVER STATE TO [NT AUTHORITY\SYSTEM]
GO
Repeat all these steps on the second SQL Server.
Create the Always On Availability Group
To proceed with the configuration it is necessary to ensure that the recovery mode of the
database that you want to insert in the group is FULL and that a full backup has been made.
In our case we have a sample database named AdventureWorksLT2019
on the Win19-SQLN01 node that we want as the primary replica.

Right-click on Always on High Availability --> New Availability Group Wizard

The wizard for creation will open, click Next

Give it a name, in this case, SQLAG01

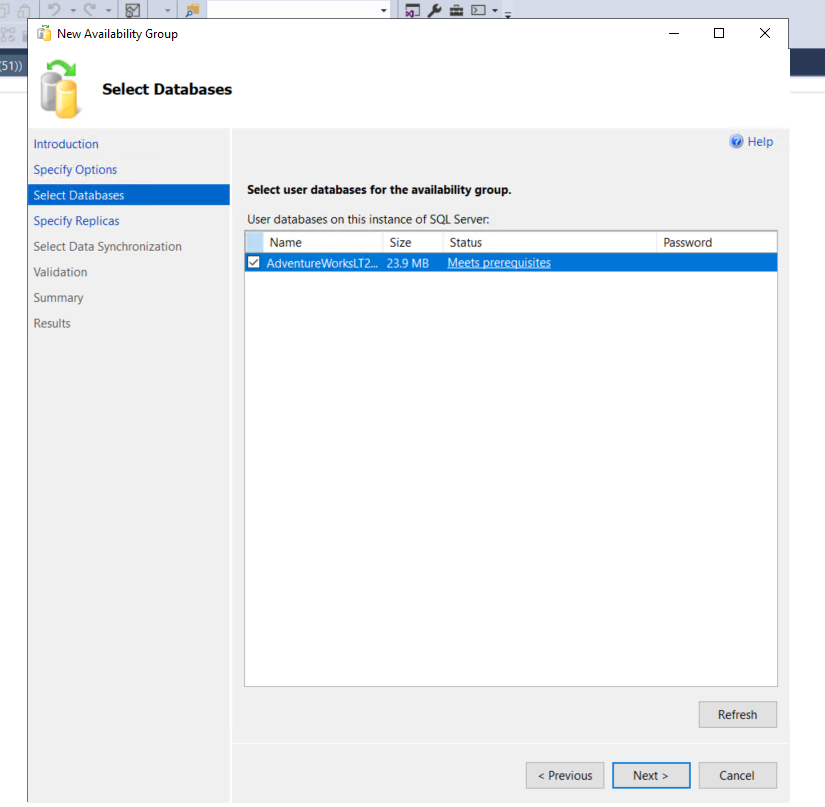
Select the database and click Next
Click Add Replica to add the second SQL Server

Select Automatic Failover, Synchronous commit, and Readable Secondary Yes.
We will see later why and how to correctly configure replication for read-only.

Look at the default URL endpoint on port 5022 that we entered earlier in firewall rules.
Do not configure the Listener now, it will be done later.
Click Next

Select how the synchronization should take place.
In this case, Automatic seeding automatically creates the synchronized database on secondary replicas.
Click Next

Don't worry if the Listener is missing from the validation.
Click Next to create the Always On Availability Group.

We have successfully created the SQLAG01 availability group

We can verify that we have the two replicas, primary and secondary

and that also on the second server the database is available and in sync.
Note: If we had put Readable Secondary not on Yes but on Read-Intend Only it would not have allowed connection to the secondary database from SSMS unless we added To the connection ApplicationIntent=readonly.
If we had put Readable Secondary No, it would not have been readable at all.

We can also see the status from the summary dashboard

Create the Load Balancer that will act as a Listener
From the Azure portal

We add the IP frontend, in this case we use the address 192.168.20.200.
Make a note of this address.

Let's add the two VMs to the backend pool


We go to Inbound Rules and create a load balancing rule for port 1433.

and let's also add the health probe rule on port 59999

Enable floating IP and click Add
Proceed with the creation.

Once the Load Balancer has been created, let's return to SQL Server Management Studio, right-click on the availability group SQLAG01 --> Add Listener

Name the listener, in this case SQLAGLISTENER and select the port.
Click Add to add the static IP.

Enter the IP you gave to the IP front-end of the Load Balancer
Click OK

The listener is now online.

To complete the configuration, note two pieces of information:
the name of the IP in Failover Cluster Manager
the name of the network
From failover Cluster Manager, Roles, Right Click on IP Address (see above) --> Properties
note the value under Name

Also on Failover Cluster Manager from the menu on the left Network --> take note of the value under Name

Stop the cluster --> Stop Role

From Powershell run this command to set the cluster parameters replacing the values with those marked previously
$ClusterNetworkName = "<MyClusterNetworkName>" # the cluster network name (Use Get-ClusterNetwork on Windows Server 2012 of higher to find the name)
$IPResourceName = "<IPResourceName>" # the IP Address resource name
$ListenerILBIP = "<n.n.n.n>" # the IP Address of the Internal Load Balancer (ILB). This is the static IP address for the load balancer you configured in the Azure portal.
[int]$ListenerProbePort = <nnnnn>

Import-Module FailoverClusters

Get-ClusterResource $IPResourceName | Set-ClusterParameter -Multiple @{"Address"="$ListenerILBIP";"ProbePort"=$ListenerProbePort;"SubnetMask"="255.255.255.255";"Network"="$ClusterNetworkName";"EnableDhcp"=0}
Example


Test the Listener
From a command prompt run this command
sqlcmd -S SQLAGLISTENER -EWe see that the SQLAGLISTENER listener responds and, as per settings, the Win19-SQLN01 primary replica is returned as the server name.
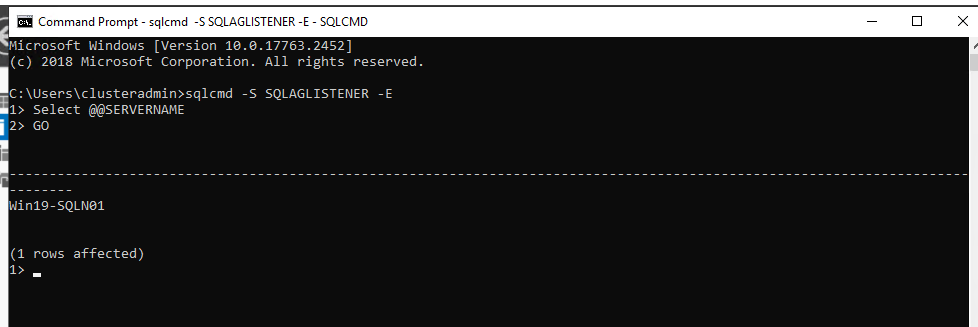
Let's run a simple query

Simulate a failover
Let's stop the primary node.
Node 1 is offline.

The availabilty group, automatically, switched the primary role to the second node which has now become the Primary in Read/Write mode.

We send the same command to the Listener and we see that the response takes place without problems but from the second node Win19-SQLN02.

Failback
When the original primary replication returns available, you can manually fail over to the new primary replica to restore the group it to its original configuration.
From SSMS right click on the availability group --> Failover.
Enter the node you want as a new primary replica, in our case Win19-SQLN01 and proceed with the wizard.

Configure the read-only replica
To always have read-only secondary replication available, such as for analytical tools such as Power BI, you need to configure some settings.
Let's go to the properties of the availability group.
In General, at the bottom, change Readable Secondary to Read-Intent Only.
If you want to access a secondary replica in an Always On configuration, the Readable Secondary property must be set to "Read-Intent" or "Yes".
What are the differences:
- Read-intent only
Only ReadOnly connections are allowed. It must then be explicitly readinted in the connection string.
- Yes
All connections are allowed, but only with read access.

Go to Read-Only Routing and we make the following changes.
This will direct read only requests to the secondary replica and, if not available, to the node itself.

Let's open a command prompt
sqlcmd -S SQLAGLISTENER -E -d AdventureWorksLT2019 -K ReadOnlyAs you can see in ReadOnly mode now responds the secondary node.

Connect to Secondary Replication from PowerBI
There is a very smart feature in PowerBI that allows you to connect to the readOnly replica supporting any failovers.
You need to open a connection to SQL Server, as a server name we enter the name of the listener, in this case SQLAGLISTENER.
Flag the last Enable SQL Server Failover support checkbox.
Click OK.
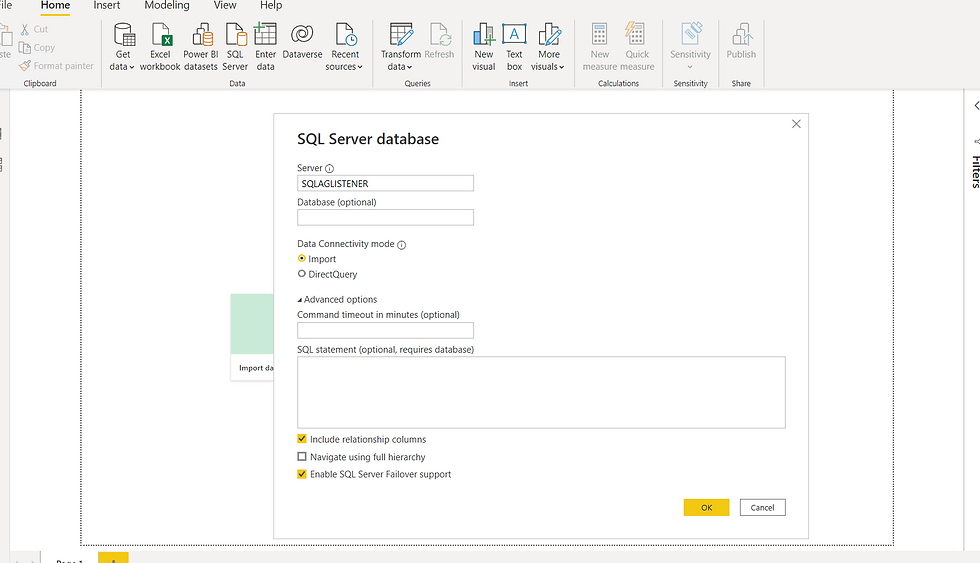
We have prepared a very simple view that returns the name of the server and its access mode, as you can see PowerBI, without further indications, goes to point to the ReadOnly replica.
We import the data and simulate another failover.

Let's create some simple visuals.

From SSMS We force failover manually.
At this point the new read/write primary replica will become Win19-SQLN02

Let's refresh the report and see that PowerBI has updated the ReadOnly replica on what is now the new secondary replica.


Comments