Azure Automation and Azure SQL Database in different network configurations
- Mattia Cavallotti
- Oct 20, 2023
- 6 min read
Azure Automation is an Azure service to simplify cloud management through process automation.
With Azure Automation, you can automate long-running, manual, error-prone, and frequently repeated tasks to increase reliability, efficiency, and time to value for your organization.
You can manage Azure SQL databases by using the PowerShell cmdlets available in the Azure PowerShell tools.
These PowerShell cmdlets are available immediately, so you can perform all SQL Database management tasks within the service, and, if necessary, associate these cmdlets with cmdlets for other Azure services, to automate complex tasks across different Azure services.
In this post we will show you how to use Azure Automation to automate a sample task when Azure SQL database is protected by different levels of network security.

You will see how to run a script in 3 scenarios:
Allow Public Access with firewall whitelist, Allow Azure services
Allow Public Access with firewall whitelist, Deny Azure services
Deny Public Access and allow only private connection
We have already configured a sample Azure SQL Database with the following features:
Server name: azsqldb-mattia-test01.database.windows.net
Database: demoDB
Pricing tier: Standard S0: 10 DTUs
Resource group: rg-demo
What we want to do is automate a database scaling task that raises the service level to the Standard S1 level on call.
This is an example but can be applied to any execution that you need to schedule and automate.
Let's create the procedure that we are going to perform through the automation account:
CREATE PROCEDURE [dbo].[usp_ScaleUpDatabase]
AS
BEGIN
	ALTER DATABASE [demoDB] MODIFY( EDITION = 'Standard',
           MAXSIZE= 2GB, SERVICE_OBJECTIVE ='S1');
	PRINT('Scaling in progress...')
END
and an instruction that returns the current service level that we will use to test whether communication with the database is successful:
SELECT db.[name] AS Database_Name,`
        srv.[edition],`
        srv.[service_objective]`
FROM sys.database_service_objectives srv`
JOIN sys.databases db ON srv.database_id=db.database_id
Let's create an automation account with managed identity enabled.
It will be used to allow the automation account to access the SQL Database through Role Based Access Control (RBAC).
Automation account name ds-automacc01
System Assigned Managed Identity enabled
Networking private access (reccomended)
Let's give the automation account access to the SQL Server with Contributor role:

From the automation account, create a credential that we are going to use to access the database from the PowerShell script without explaining its contents:

Finally, import the following modules into Automation Account - Shared Resources - Modules:

Scenario 1: Allow public endpoint - Allow Azure services
When you create an Azure SQL database with predefined settings, the network security settings are as follows:

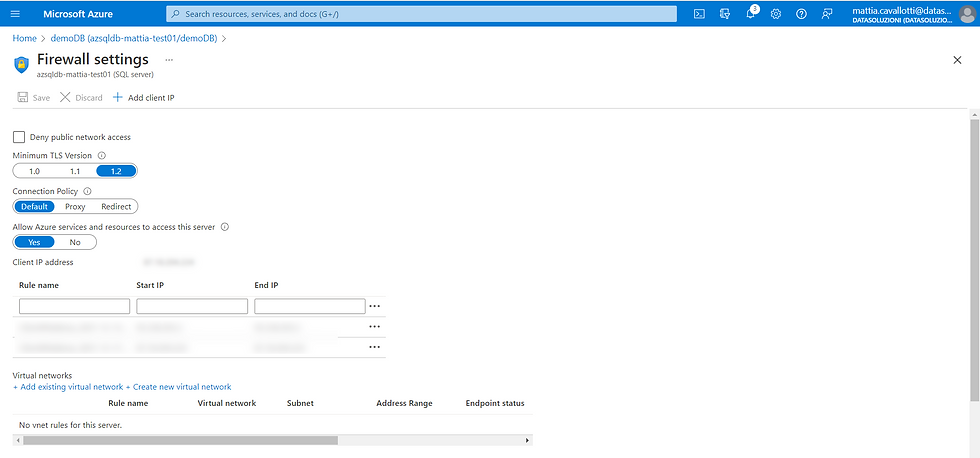
Access is allowed through a public endpoint with firewall rules based on IP addresses or Azure virtual networks and the Allow Azure services and resources to access this server flag set to Yes.
When set to Yes, the server allows communication from all resources within Azure boundaries, which may or may not be part of the subscription.
In this case, nothing more than authentication to Azure is required to connect from the automation account and run a SQL script on the database, as the automation account will use an internal Azure service IP address to connect that is granted by the Allow Azure services and resources to access this server flag.
From the automation account let's create a Powershell runbook and insert the following script:
Set-Item Env:\SuppressAzurePowerShellBreakingChangeWarnings "true"
#Connect to Azure with Managed identity

# Ensures you do not inherit an AzContext in your runbook
Disable-AzContextAutosave -Scope Process

# Connect to Azure with system-assigned managed identity
$AzureContext = (Connect-AzAccount -Identity).context

# set and store context
$AzureContext = Set-AzContext -SubscriptionName $AzureContext.Subscription -DefaultProfile $AzureContext

try
{
    # Connect to Azure with system-assigned managed identity
    $AzureContext = (Connect-AzAccount -Identity).context
    # set and store context
    $AzureContext = Set-AzContext -SubscriptionName $AzureContext.Subscription -DefaultProfile $AzureContext
    Write-Output $AzureContext
}
catch {
    Write-Error -Message $_.Exception
    throw $_.Exception
}

$db_name=(Get-AzSQLDatabase -ResourceGroupName '<your-sql-db-resource-group>' -ServerName 'your-logical-server-name' -Database 'your-database-name').DatabaseName
$cred = Get-AutomationPSCredential -Name 'your-credential-name'

$Sql_output=$(Invoke-Sqlcmd -ServerInstance "<your-logical-server-name>.database.windows.net" `
 -Username $cred.UserName -Password $cred.GetNetworkCredential().Password `
 -Database $db_name `
 -Query "SELECT db.[name] AS Database_Name,`
        srv.[edition],`
        srv.[service_objective]`
        FROM sys.database_service_objectives srv`
        JOIN sys.databases db ON srv.database_id=db.database_id" `
 -Verbose)

Write-Output $Sql_output

This command will authenticate to the database using the "SQL_cred" credentials that we have set and return the current service level of the database:

Once we have tested that the connection is successful, we can run the script for scaling the service tier:


As you can see the procedure is executed correctly and the database proceeds to the scale up process from S0 to S1:

Scenario 2: Allow public endpoint - Deny Azure services
Let's see what happens if we set the flag Allow Azure services and resources to access this server to No.

Let's test the previous runbook and see the result:

In this case the command fails, signaling that the IP 52.174.246.145 is not authorized by the firewall to access.
The problem with this IP that is used by Automation Account is that, even if we authorize it with a rule in the firewall of the SQL Database, it will change with each execution.
To overcome the problem you can add to the PowerShell script a statement to determine the current IP and authorize it with an ad hoc rule, before proceeding to execute the SQL command.
$response = Invoke-WebRequest ifconfig.co/ip -UseBasicParsing
    $ip = $response.Content.Trim()

New-AzSqlServerFirewallRule `
        -ResourceGroupName "<your-sql-db-resource-group>" `
        -StartIpAddress $ip `
        -FirewallRuleName "Allow-Automation" `
        -EndIpAddress $ip -ServerName <your-logical-server-name>
In this case the command will create a rule that we call "Allow-Automation" for the current IP and the command is successfully executed.


In the same way you can then remove the same firewall rule and recreate it every time:
Remove-AzSqlServerFirewallRule `
        -ServerName <your-logical-server-name> `
        -FirewallRuleName "Allow-Automation" `
        -ResourceGroupName "<your-sql-db-resource-group>" `
        -Force

Scenario 3: Allow only private connections
Let's see what happens if we remove access to the database via public endpoint.

As you can see, the whitelist options are no longer selectable and access is only allowed through a private endpoint.
We create a private endpoint by defining the supporting virtual network, in this case
Vnet-demo01.

We run the script that authenticated through firewall again:

In this case the error is different and says that the connection failed because "Deny public access is set to Yes", "to connect to this server use the private endpoint from inside your virtual network".
You must run the Automation runbook on the private network where sql Server is now located.
To do this you need to configure a Hybrid Worker, that is, a machine located in the private network that has access to the private endpoint of the SQL server.
On this machine we will install an agent that allows the runbook to run from Azure Automation directly in the on-premises environment.

The steps to follow are:
If not available, create the VM that will act as a Hybrid Worker
Create a Hybrid-Worker Group from your automation account
If not available, create a Log Analytics Workspace
Configure the Hybrid Worker machine
In this case, we created an Azure Windows Server 2019 VM called HW-01 and
a log Analytics Workspace log-analytics-demo01.
From the automation account create a Hybrid Worker group, in this case called hybrid-group-01.

Note that initially the number of Hybrid Workers is 0, as we have not yet registered any machines.

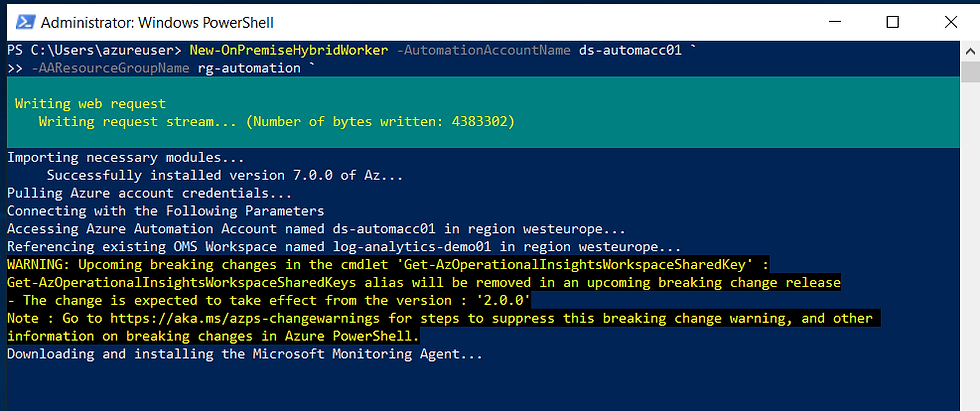
Enter the HW-01 VM and run the following PowerShell commands, wait for the modules to install, authenticate to Azure, and wait for them to complete.
Install-Script -name New-OnPremiseHybridWorker
New-OnPremiseHybridWorker -AutomationAccountName <your-automation-account-name>`
-AAResourceGroupName <autom-account-resource-group>`
-OMSResourceGroupName <log-analytics-worskapce-resource-group>`
-HybridGroupName <hybrid-group-name>`
-SubscriptionID <your-subscription-id>`
-WorkspaceName <log-analytics-workspace-name>


The instruction ends with PS C:Program Files...... HybridRegistration>
and you can verify from the Azure portal that the number of Hybrid Workers has changed to 1 and the VM has been correctly registered.


Also install the SqlServer module:
Install-Module -Name SqlServer
At this point all that remains is to test the operation of the runbook.
We run the first version without creating firewall rules:
Set-Item Env:\SuppressAzurePowerShellBreakingChangeWarnings "true"
#Connect to Azure with Managed identity

# Ensures you do not inherit an AzContext in your runbook
Disable-AzContextAutosave -Scope Process

# Connect to Azure with system-assigned managed identity
$AzureContext = (Connect-AzAccount -Identity).context

# set and store context
$AzureContext = Set-AzContext -SubscriptionName $AzureContext.Subscription -DefaultProfile $AzureContext

try
{
    # Connect to Azure with system-assigned managed identity
    $AzureContext = (Connect-AzAccount -Identity).context
    # set and store context
    $AzureContext = Set-AzContext -SubscriptionName $AzureContext.Subscription -DefaultProfile $AzureContext
    Write-Output $AzureContext
}
catch {
    Write-Error -Message $_.Exception
    throw $_.Exception
}

$db_name=(Get-AzSQLDatabase -ResourceGroupName '<your-sql-db-resource-group>' -ServerName 'your-logical-server-name' -Database 'your-database-name').DatabaseName
$cred = Get-AutomationPSCredential -Name 'your-credential-name'

$Sql_output=$(Invoke-Sqlcmd -ServerInstance "<your-logical-server-name>.database.windows.net" `
 -Username $cred.UserName -Password $cred.GetNetworkCredential().Password `
 -Database $db_name `
 -Query "SELECT db.[name] AS Database_Name,`
        srv.[edition],`
        srv.[service_objective]`
        FROM sys.database_service_objectives srv`
        JOIN sys.databases db ON srv.database_id=db.database_id" `
 -Verbose)

Write-Output $Sql_output
In the test pane, note how the Run on Hybrid-Worker option appeared on the left, which was not available before.
We select hybrid-worker-group01.

We can see that the command correctly returns the result of the SQL statement, and the scaling procedure is also successfully performed.


To schedule the runbook you will need to set Run Settings to Hybrid Worker in the Parameters section of the scheduling panel.

You can then check the success of the jobs scheduled on Process Automation - Jobs:


Comments